With the coming of Cloud-Native Applications, the need to handle, scale and integrate containers instead or with the traditional applications, is bringing a lot of IT professionals to be more and more involved in the Kubernetes world. In fact, this new model to deliver workloads has different roles and approaches compared to the traditional virtual machines. The creation and the maintenance of a container orchestrator cluster (Kubernetes becomes the new standard to orchestrate containers) seems a little bit different and sometimes more complicated compared to other infrastructure elements.
If you plan to deliver a Kubernetes cluster in a cloud tenant, probably, your cloud provider could offload a lot of complex maintenance tasks, but on-premise things are really different. First off: where and how to start creating your cluster? Secondly, how to handle and integrate your Kube cluster.. and finally how to handle multiple environments and multiple clusters?
Rancher is an interesting solution, that really brings every Kubernetes clusters in a single-pane-of-glass view, introducing an easy to apply RBAC and integrating a lot of staff that transform a simple vanilla Kube cluster in a production-ready once. Let me say: << With Rancher, deploying a Kube cluster is no more a learning purpose stage, but become a real Enterprise process!>>
Going through the architecture, Rancher is a container image that could be deployed in a new or already running Docker environment (like another Kube or single Docker hosts), that using cloud or infrastructure connections and credential is able to deliver workload instances and automatically deploy the needed containers to specialize Master and Workers Kubernetes nodes.

In this way, it doesn’t matter what you’ve used as underline technology, it simply handles a Kubernetes cluster adding also some components that are really useful for the cluster life-cycle. With Rancher, you have a very usable UI and a powerful gateway to the handled Kube clusters in a single product.
The installation…
The keyword here is: <<make it simplest>>! Yet we have seen that docker is the best way to deliver applications ion every environment, using the abstraction that boosts distribution and enables continuous integration and delivery. In the same way, the Rancher instance is available as a container image ready to deploy in Kube or a single Docker host. If you plan to “test” or play with Rancher, the simplest way is to deliver a single Docker host, but in case of production, the procedure seems a little bit complex, but guided! Check here for furthers.
One of my favorite way to automate the deployment of the rancher host is by the Terraform template. Following the example:
|
1 2 3 4 5 6 7 8 9 10 11 12 13 14 15 16 17 18 19 20 21 22 23 24 25 26 27 28 29 30 31 32 33 34 35 36 37 38 39 40 41 42 43 44 45 46 47 48 49 50 51 52 53 54 55 56 57 58 59 60 61 62 63 64 65 66 67 |
resource "vsphere_virtual_machine" "rancher01" { name="${var.rancher01_name}" guest_id="${data.vsphere_virtual_machine.template.guest_id}" resource_pool_id="${data.vsphere_resource_pool.pool.id}" datastore_id="${data.vsphere_datastore.datastore.id}" folder="${var.vm_folder}" num_cpus=2 memory=2048 wait_for_guest_net_timeout=0 network_interface { network_id="${data.vsphere_network.network_mgmt.id}" } disk { label="sda" unit_number=0 size="${data.vsphere_virtual_machine.template.disks.0.size}" eagerly_scrub="${data.vsphere_virtual_machine.template.disks.0.eagerly_scrub}" thin_provisioned="${data.vsphere_virtual_machine.template.disks.0.thin_provisioned}" } clone { template_uuid="${data.vsphere_virtual_machine.template.id}" customize { linux_options { host_name = "${var.rancher01_name}" domain = "yourdomain.lab" } network_interface { ipv4_address = "${var.rancher01_ip}" ipv4_netmask = 24 } dns_server_list = ["192.168.a.b","8.8.8.8"] ipv4_gateway = "192.168.c.d" ## Your gw } } provisioner "file" { source = "script.sh" destination = "/tmp/script.sh" connection { host = "${var.rancher01_ip}" type = "ssh" user = "${var.rancher01_user}" password = "${var.rancher01_pwd}" } } provisioner "remote-exec" { inline = [ "chmod +x /tmp/script.sh", "/tmp/script.sh" ] connection { host = "${var.rancher01_ip}" type = "ssh" user = "${var.rancher01_user}" password = "${var.rancher01_pwd}" } } } |
In order to execute this template, you must prepare an Ubuntu vSphere template (or the distro you prefer) with docker installation, and attach a variables file that contains the rancher data like local credentials, IP address,… Finally, the installation script should be something like the following:
|
1 2 3 4 5 6 7 |
#!/bin/bash sudo apt-get install -y apt-transport-https ca-certificates curl gnupg-agent software-properties-common sudo curl -fsSL https://download.docker.com/linux/ubuntu/gpg | sudo apt-key add - sudo add-apt-repository "deb [arch=amd64] https://download.docker.com/linux/ubuntu $(lsb_release -cs) stable" sudo apt-get update sudo apt-get install -y docker-ce docker-ce-cli containerd.io sudo docker run -d --restart=unless-stopped -p 80:80 -p 443:443 rancher/rancher |
Note: you may include the docker installation as an imperative process on top and use a docker-compose file instead of docker run statement.
In a lot of Enterprise environment problably this step is owned by a configuaration management like Puppet, Ansible,…
After VM is up and running with the Rancher instance, you’re ready to deploy the first cluster. In this post, I’ll show the VMware vSphere deployment.
The first K8S cluster on-premise
After Rancher instance is up and running (connecting with https://<server_ip> you must set admin password), you are ready to build the first on-premise K8s cluster. Logging with admin credentials (or user with admin rights), complete the following steps:
- Insert cloud credentials (private or public) under the logged-user icon (placed top-right), cloud credentials.
- Define a template (in vSphere environment you should choose between preparing it from scratch, download, and import existing ones or use boot2docker).
- In order to define a new template from the global view, just click the logged-user icon (placed top-right), Node template.
- Here, based on your target infrastructure it’s possible to create a template for AWS (EC2), Azure, vSphere and more…
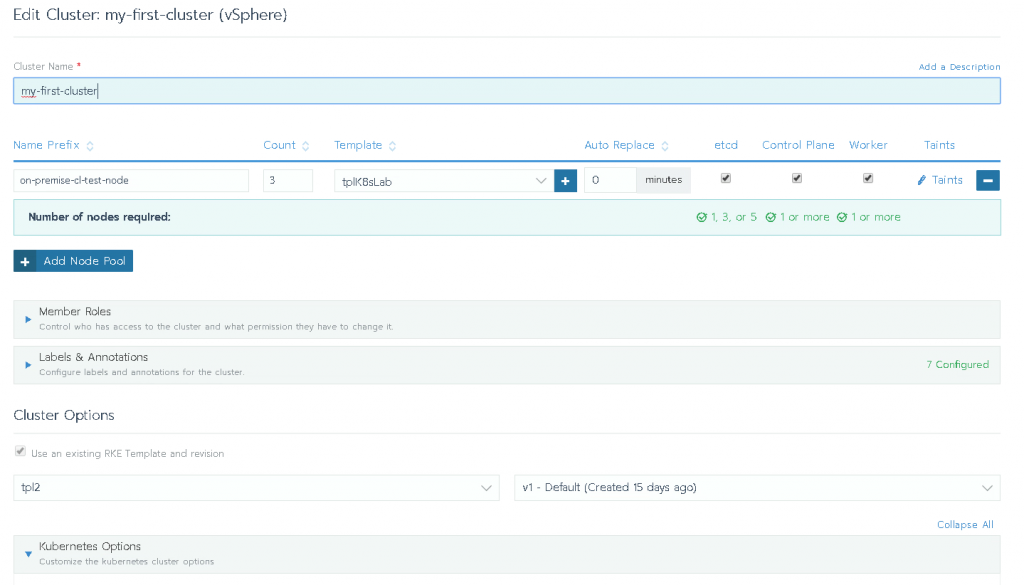
- Define the cluster under Global, Clusters. This is the main part of the show, where finally you can describe every cluster elements like:
- Node definition (how many masters and etcd and how many workers), with the relative templates.
- Kubernetes version
- Networking type, like Flannel, Calico,…
- Other cluster options. Depending on the underline technology or other definitions like storage or advanced configurations.
- These steps are officially documented here: https://rancher.com/docs/rancher/v2.x/en/cluster-provisioning/rke-clusters/node-pools/vsphere/
- If you plan to install a bare-metal cluster (I discourage this practice) or you’ve got an already created cluster, just follow the official guide here: https://rancher.com/docs/rancher/v2.x/en/cluster-provisioning/imported-clusters/
In the vSphere production environment, probably DHCP and DNS server are two mandatory elements because are directly involved in the management and workload IP assignment and resolution. Following an example:

After a couple of minutes, depending on the number of nodes and the chosen cloud technology, you should have a fully functional cluster ready to accept docker applications
Note on Boot2Docker with vSphere:
Starting with release >2.3, the use of the latest boot2docker release seems to have an issue with the sharing volume. In fact, during the deployment of the K8s nodes, you could encounter the following blocking error: Path /var/lib/kubelet is mounted on / but it is not a shared mount. This issue is related to a missing configuration in the boot2docker image which is mandatory in this context.
According to with the issue https://github.com/rancher/rancher/issues/12205 one possible workaround is to type the following commands in every node using the vSphere console:
…and wait. The cluster should be ready in a couple of minutes after this update. This is a manual way that I prefer not to use.
Another solution is simply changing ISO URL to https://github.com/boot2docker/boot2docker/releases/tag/v17.03.2-ce in the node template definition under logged-user icon (placed top-right), Node Template option.
Now you’re able to use the cluster in three ways:
- Accessing the UI (Global -> clusters -> Launch kubectl)
- Using kubectl CLI. You can find all you need to add in you .kube/config simply choosing the destination cluster (Global -> clusters -> Kubeconfig file)
- Using the Rancher CLI (needs kubectl client)
This concludes the first dive into cluster K8s delivered using Kubernetes… In the next posts, I’ll show the “EKS” deployment and the principal operations and integration with the most common products, like HashiCorp, Gitlab, Jenkins, Artifactory, etc… Stay tuned!