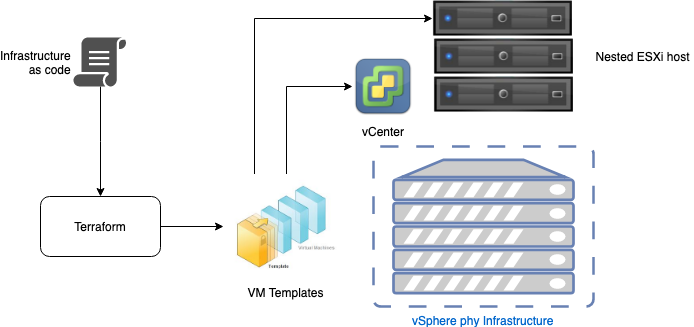
As promised on my post here, it’s time to show how dive into vSphere scenarios generating the “infrastructure as code”. In fact, the modern cloud infrastructures are more and more delivering the final customer using many automation tools like Terraform. In this way, it is possible to consume cloud resources regardless of the underline cloud IaaS, and at the same time, keeping track of changes. In this post, I’ll show how I set up and coded vCenter and nested ESXi hosts.
In order to successfully deliver the environment, elements are important to prepare and upload all needed templates like:
- ESXi nested VM
- vCenter
- Windows and Linux template.

Windows and Linux template are the easiest part of the deployment: create a new VM, install the OS and VMware tools. The ESXi template generation is a little bit complicated, but luckily, William Lam has shared his ESXi template image here: https://www.virtuallyghetto.com/2017/05/updated-nested-esxi-6-0u3-6-5d-virtual-appliances.html.
ESXi Environment Setup
I don’t wanna spend too much time about Terraform download and installation… just check the official website here or simply on MAC open a console and type:
|
1 |
<span class="s1">brew install terraform</span> |
Before continuing, it’s necessary to check some underline virtual environment he underlines virtual infrastructure:
- All vSwitch used as physical switches for nested ESXi must be configured in promiscuous mode and “forged transmit” enabled
On my infrastructure I’ve got the following scenario:
- Firewall/Router with DHCP based on pfSense 192.168.200.254
- Domain: linoproject.lab and DC 192.168.200.10
- Management LAN 192.168.200.0/24: IPs from 20-23 are already assigned… so we can use IPs from 30 to 39 (3 are enough)
- PC with Terraform, powerCLI and VCSA Image can reach vSwitch physical infrastructure by the firewall/Router (adding another NIC connected to local LAN)
The following example deploys ESXi hosts with two NIC cards: one is connected to the laboratory network and the other is available for NAS/SAN.
Note: the following automation doesn’t include DNS configuration and post installation configuration process. It’s possible to realize a fully configurable process simply using PowerSHELL/CLI to complete the configurations connecting with the hosts and vCenter after the complete nested VM deploy.
Now it’s possible to deploy the previously downloaded ESXi virtual appliance via vCenter and convert it in Template… but wait!
According to Troy Lindsay’s blog, before reconverting the VM in the ESXi template, it’s necessary to download and execute (after Connect-VIServer) this PowerCLI script to enable debug properties in the VM or vAPP Template. This script contains a fix documented here that overcomes a Terraform issue during the “apply” process.
Now it’s time to write the terraform file using the editor you like. Create a directory and write the main.tf file as following
|
1 2 3 4 5 6 7 8 9 10 11 12 13 14 15 16 17 18 19 20 21 22 23 24 25 26 27 28 29 30 31 32 |
provider "vsphere" { version="~> 1.3" vsphere_server="vcsa-01.linoproject.lab" #Change with your data allow_unverified_ssl=true password="***********" } data "vsphere_datacenter" "dc" { name="HomeLabWorkload" #The target dc } data "vsphere_resource_pool" "pool" { name="Resources" datacenter_id="${data.vsphere_datacenter.dc.id}" } data "vsphere_datastore" "datastore" { name="datastore1" #Change with your datastore name datacenter_id="${data.vsphere_datacenter.dc.id}" } # Management interface data "vsphere_network" "network_mgmt" { name="lablan" datacenter_id="${data.vsphere_datacenter.dc.id}" } # SAN interface data "vsphere_network" "network_san" { name="naslan" datacenter_id="${data.vsphere_datacenter.dc.id}" } |
This is the common part that describes where to deploy the VMs which must be referenced as a template:
|
1 2 3 4 |
data "vsphere_virtual_machine" "template" { name="Nested_ESXi6.0u3_Appliance_Template_v1.0" datacenter_id="${data.vsphere_datacenter.dc.id}" } |
Then describe every VM using the following statements:
|
1 2 3 4 5 6 7 8 9 10 11 12 13 14 15 16 17 18 19 20 21 22 23 24 25 26 27 28 29 30 31 32 33 34 35 36 37 38 39 40 41 42 43 44 45 46 47 48 49 50 51 52 53 54 55 56 57 58 59 60 61 62 63 64 65 66 67 68 69 70 |
resource "vsphere_virtual_machine" "esxi1" { name="esxi31.linoproject.lab" guest_id="${data.vsphere_virtual_machine.template.guest_id}" resource_pool_id="${data.vsphere_resource_pool.pool.id}" datastore_id="${data.vsphere_datastore.datastore.id}" folder="NestedESXi60" num_cpus=2 memory=6144 wait_for_guest_net_timeout=0 network_interface { network_id="${data.vsphere_network.network_mgmt.id}" } network_interface { network_id="${data.vsphere_network.network_san.id}" } disk { label="sda" unit_number=0 size="${data.vsphere_virtual_machine.template.disks.0.size}" eagerly_scrub="${data.vsphere_virtual_machine.template.disks.0.eagerly_scrub}" thin_provisioned="${data.vsphere_virtual_machine.template.disks.0.thin_provisioned}" } disk { label="sdb" unit_number=1 size="${data.vsphere_virtual_machine.template.disks.1.size}" eagerly_scrub="${data.vsphere_virtual_machine.template.disks.1.eagerly_scrub}" thin_provisioned="${data.vsphere_virtual_machine.template.disks.1.thin_provisioned}" } disk { label="sdc" unit_number=2 size="${data.vsphere_virtual_machine.template.disks.2.size}" eagerly_scrub="${data.vsphere_virtual_machine.template.disks.2.eagerly_scrub}" thin_provisioned="${data.vsphere_virtual_machine.template.disks.2.thin_provisioned}" } clone { template_uuid="${data.vsphere_virtual_machine.template.id}" } vapp { properties { "guestinfo.hostname" = "esxi31" "guestinfo.ipaddress" = "192.168.200.31" # Default = DHCP "guest info.netmask" = "255.255.255.0" "guestinfo.gateway" = "192.168.200.254" "guestinfo.vlan" = "" "guestinfo.dns" = "192.168.200.10" "guestinfo.domain" = "linoproject.lab" "guestinfo.ntp" = "pool.ntp.org" "guestinfo.syslog" = "" "guestinfo.password" = "xxxxxx" "guestinfo.ssh" = "True" # Case-sensitive string "guestinfo.createvmfs" = "False" # Case-sensitive string "guestinfo.debug" = "False" # Case-sensitive string } } lifecycle { ignore_changes= [ "annotation", "vapp.0.properties", ] } } |
For the second and the third ESXi just repeat the statements above, changing resources name, properties, etc…
Finally, it’s time to deploy :
|
1 2 3 4 5 |
terrafom init terraform plan terraform apply |
After a couple of minutes (depending on the physical and nearby virtual environment) you should have your nested hosts up and running.
The source for this post is: https://www.troylindsay.io/2018/04/10/using-terraform-to-deploy-nested-esxi-hosts/
Thanks to Troy Lindsay for sharing his experience.
VCSA is still WIP, but in the meantime, you can check the alternative deployment based on PowerCLI from Lam’s blog: https://www.virtuallyghetto.com/2016/11/vghetto-automated-vsphere-lab-deployment-for-vsphere-6-0u2-vsphere-6-5.html, and this Github deployment script repo: https://www.virtuallyghetto.com/2016/11/vghetto-automated-vsphere-lab-deployment-for-vsphere-6-0u2-vsphere-6-5.html
For further information about Terraform with vSphere Provider just check the official documentation here: https://www.terraform.io/docs/providers/vsphere/index.html
