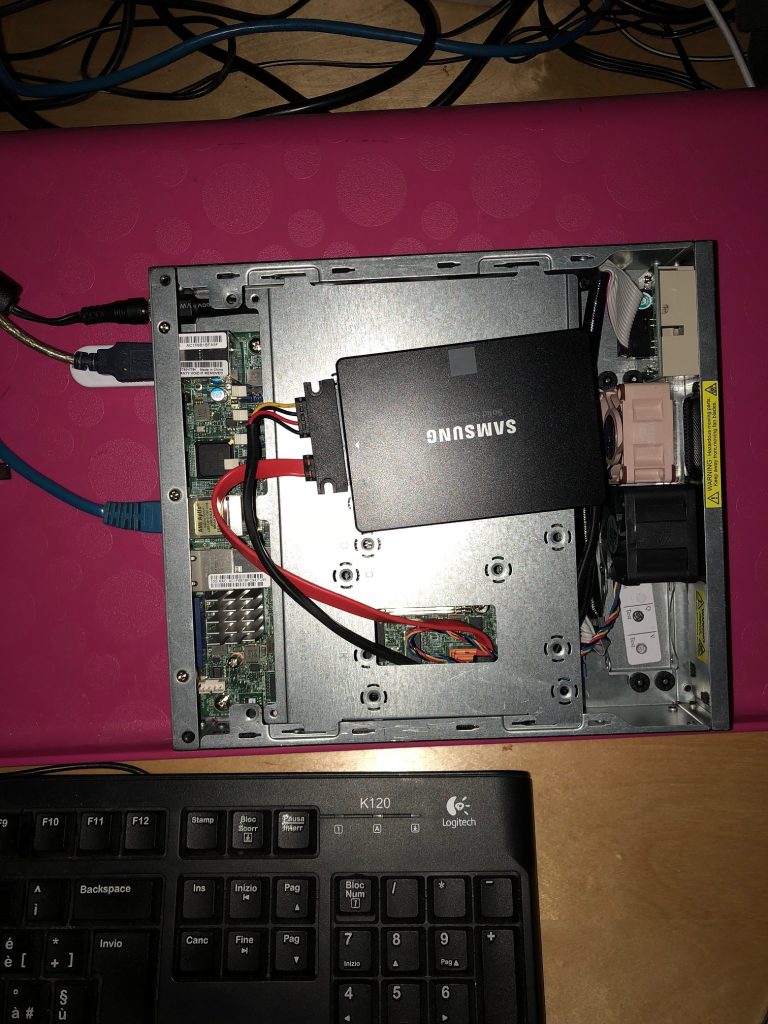
Hi folks! During these days I realized a nested lab based on VMware vSphere 6.5 on a single Supermicro E200-8D. Spending more or less 1500€ I grabbed a SuperMicro E200-8D mini server with the following equipment:
- 32GB RAM bought on Crucial (http://www.crucial.com/usa/en/superserver-e200-8d/CT9319014)
- 1 SSD 500GB (planning to buy another SSD in order to separate the workloads)
Let me say, this server, except the initial fan noise, has a good WAF (Wife Acceptance Factor) and has enough resources to build a nested environment based on vSAN, NSX and other “services” like vRO, vRA using a single physical element.
The original assembled system came with noisy fan, that is not good for your brain if working several hours. In this case you’ve 2 choices:
- Move your lab in a dedicated box with external air flow system
- replace fans with Noctua NF-A4x20-5V-PWM
In all cases use IPMI View APP to keep under control the temperature ( https://www.supermicro.com/solutions/SMS_IPMI.cfm )
The external connection is realized using a simple 8 ports 1Gbe switch (only 30€) and it could be used to connect client and another appliance to scale the environment and test something more complex like multisite scenario.
Here my macro steps for physical and logical lab deployment:
- Install ESXi (I suggest vSphere 6.7) in a USB Stick (8GB is enough)
- Install a pfSense or virtual firewall (in order to isolate traffic inside and outside the lab)
- Install a Domain controller with DNS. If you plan to use a simple DNS and you’ve deployed a pfSense, you could simply install “bind” module on pfSense and create the zone lab
- Create a datastore using the available SSD disk and upload the ESXi vanilla ISO images and other OSes
- Configure three vSwitch:
- one for production connected with one physical uplink (don’t care about redundancy because your “production” hardware will be virtual! )
- one for Management isolated
- one for SAN/VSAN isolated (could be connected with 10Gbe if you plan to use external NAS/SAN)
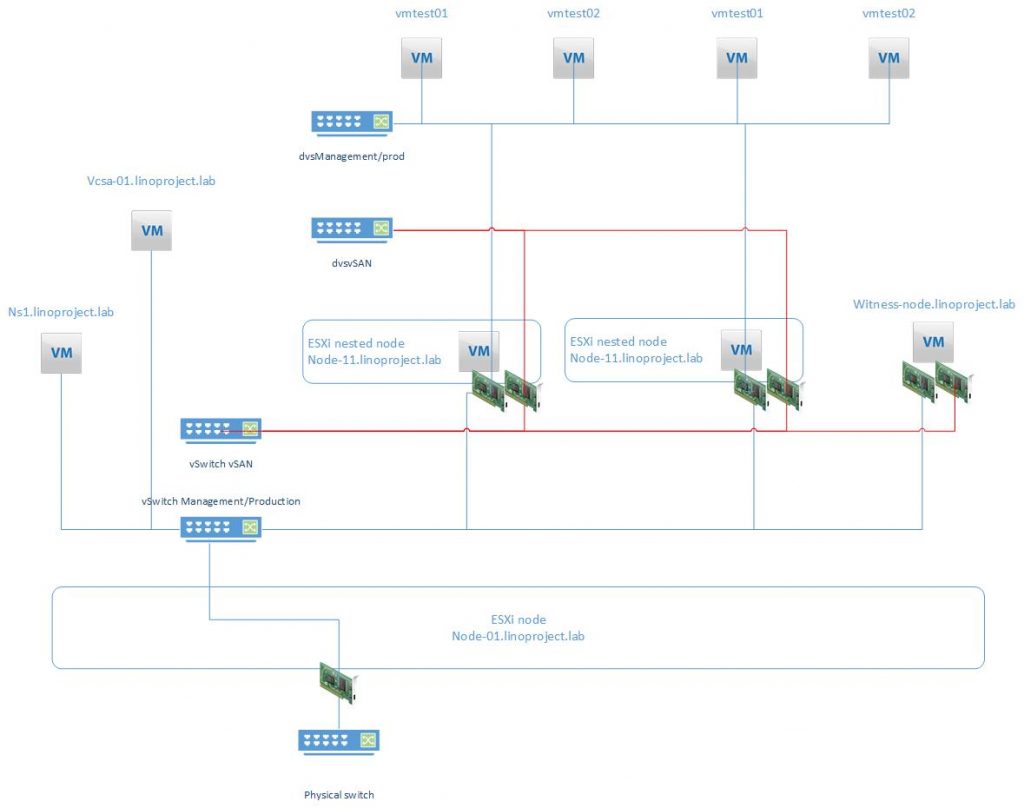
The “real” vSphere lab deployment
Every ESXi hosts are single VM with the following settings:
- 4 vCPU
- 8-10 GB RAM
- one 10GB (or more) vmdk (for cache tier)
- one 100GB (or more) vmdk (for capacity tier)
- 4 vNIC (2 for management/production, 2 for vSAN… it’s possible add more nics to test other features like iSCSI, backup, NSX)
- Enable CPU feature: virtualization to Guest OS

- Enable promiscuous mode and forged transmit in ESXi host vSwitch. (check Lam’s post here)
The vCenter appliance is installed directly in the physical ESXi to avoid overheads and keep free all nested hosts to run the “production” workload. Keep in mind to deploy VCSA using tiny configuration (you could reduce more the amount of vCPU and RAM in order to reduce infrastructure consumption, but keep in mind that limiting the vCenter could cause failures or unpredictable behaviours).
vSAN Cluster setup
About vSAN, I simply choose a layout with 2 nodes (raid-1) and a virtual witness. Witness installation is really easy because it is another ESXi nested node.
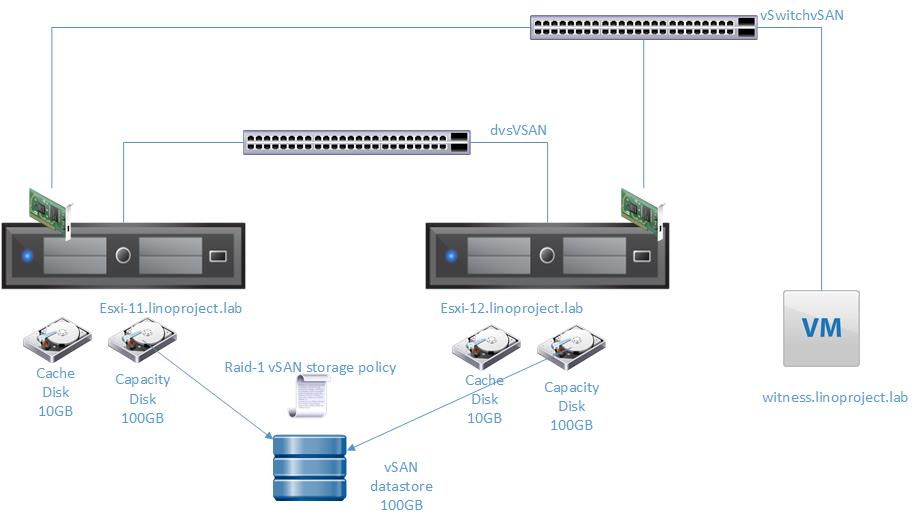
In order to enable vSAN you must:
- create in the phy ESXi host a dedicated vSwitch with no uplink and attach at least one nested ESXi vminc.
- create the cluster and import (or move) only the two nested ESXi hosts (don’t enable DRS or HA)
- deploy Witness appliance out of the cluster (but in the same datacenter) and configure management and vsan ip
- In the vCenter create a distributed virtual switch for VSAN traffic, using the nested ESXi nics as uplinks. Then configure vmkernel portgroups in every nested ESXi hosts.
- Follow the procedure to enable VSAN with raid-1 with witness
After a couple of minutes your vsan datastore should be ready to be used.
Wrap up and future improvements
Nested lab is the best way to test vSphere features without compromise, modify or destroy production environment and gaining the ability to deploy every ESXi hosts without touch any physical connection and hardware component.
Another key factor is the ability to “freeze” the lab, simply suspending all the workload when you’re not using the lab (your wife will be happy 😉 ). When it’s time to play again, simply power on the physical host and resume all VMs. The lab will be ready in less time than the normal boot up.
Last but not the least, the ability to snapshots and/or backup the entire lab using a backup software for virtual environments.
Stay tuned for my next improvements.
Thanks to Computer Sistem for hardware provisioning
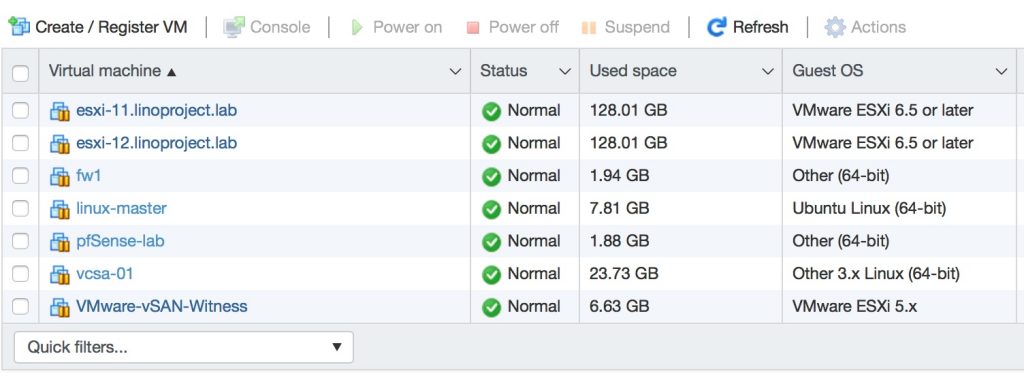
[…] My vSAN LAB […]
[…] written here, my lab is ruled by a single vCenter server with two physical ESXi hosts and 2 nested ESXi hosts. […]