Objective 8.1: Differentiate single and Cross-vCenter NSX deployments
Understand the benefits/use cases for Cross-vCenter NSX
Use Case:
- To overcome scale limits of vCenter Server
- To accommodate products that require dedicated or multiple vCenter Server systems, such as Horizon View or Site Recovery Manager
- To separate environments, for example by business unit, tenant, organization, or environment type
In NSX 6.1 and earlier, if multiple vCenter NSX environments are deployed, they must be managed separately, but in 6.2 you can create universal objects on the primary NSX Manager, which are synchronized across all vCenter Servers systems in the environment.
Features:
- Increased span of NSX logical networks -> the sam logical networks are available across vCenter NSX env -> it’s possible connect to the same logical net the VMs on any cluster on any vCenter.
- Centralized security policy management
- Support of new mobility boundaries in vSphere 6, including cross vCenter and long distance vMotion across logical switches.
- Enhanced support for multi-site environments, from metro distance to 150ms RTT. This includes both active-active and active-passive datacenters
Benefits:
- Centralized management of universal objects, reducing administration effort.
- Increased mobility of workloads – VMs can be vMotioned across vCenter Servers without having to reconfigure the VM or change firewall rules.
- Enhanced NSX multi-site and disaster recovery capabilities.
Mechanism:
- multiple vCenter paired with their own NSX manager
- On NSX manager has primary NSX manager role and the others automatically gain the secondary NSX manager roles.
- Primary can create universal objects such as: universal logical switches and universal logical routers (secondaries can view them but they can’t modify)
- Primary and Secondary NSX manager can own their local objects (they are not visible by the other NSX Managers)
Source: https://docs.vmware.com/en/VMware-NSX-for-vSphere/6.2/nsx_62_cross_vc_install.pdf
Understand options for ingress and egress traffic flows in a multi-site topology
Describe and differentiate Universal components
Universal components:
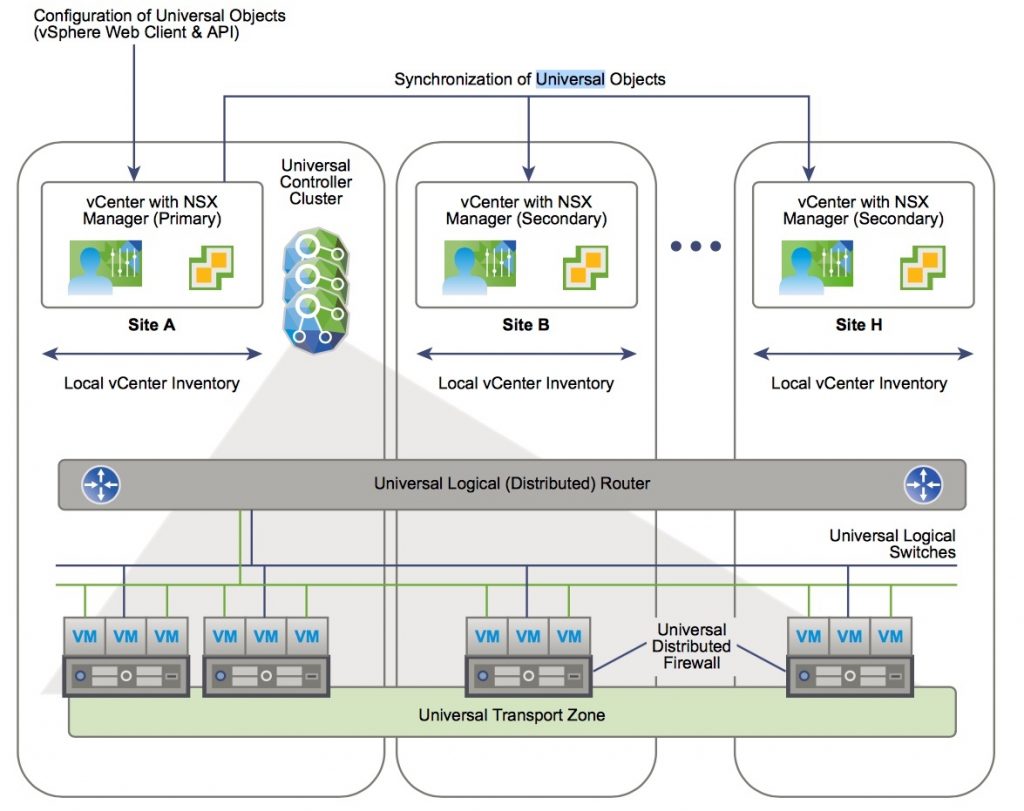
- Universal controller cluster: each cross-vCenter NSX environment has one universal controller cluster associated with the primary NSX Manager.
- Secondary NSX Managers do not have a controller cluster.
- It maintains information about universal logical switches and universal logical routers as well as logical switches and logical routers that are local to a vCenter NSX pair.
- Universal Transport Zone: is created on the primary NSX Manager, and is synchronized to the secondary NSX Managers
- there’s only one universal transport zone per cross-vCenter environment.
- Clusters that need to participate in universal logical networks must be added to the universal transport zone from their NSX Managers
- Universal Logical Switches: allow layer 2 networks to span multiple sites
- The segment ID pool is used to assign VNIs to logical switches, and the universal segment ID pool is used to assign VNIs to universal logical switches. These pools must not overlap.
- You must use a universal logical router to route between universal logical switches. If you need to route between a universal logical switch and a logical switch, you must use an Edge Services Gateway
- Universal Logical (Distributed) Routers: offer centralized administration and a routing configuration that can be customized at the universal logical router, cluster, or host level
- you must choose whether to enable local egress, as this cannot be changed after creation -> Local egress allows you to control what routes are provided to ESXi hosts based on an identifier, the locale ID.
- Universal Firewall Rules: allows centralized management of rules that apply to all vCenter Servers in your environment
- It supports cross-vCenter vMotion which enables you to move workloads or virtual machines from one vCenter Server to another and seamlessly extends your software defined datacenter security.
- From the primary NSX Manager you can create a distributed firewall rule section that is marked for universal synchronization
- Feature not supported in cross-vCenter:
- Esclude List
- SpoofGuard
- Flow monitoring for aggregate flows
- Network service insertion
- Edge Firewall
- Universal Network and Security Objects
- Universal IP Sets
- Universal MAC Sets
- Universal Security Groups
- Universal Services
- Universal Service Groups
Determine the appropriate NSX topology for a given use case
- Cross-vCenter NSX in a single site

- Single Universal Transport Zone
- Single ULDR
- NSX Edges in Primary NSX Manager with Universal Controller Cluster
- Cross-vCenter NSX spanning 2 sites
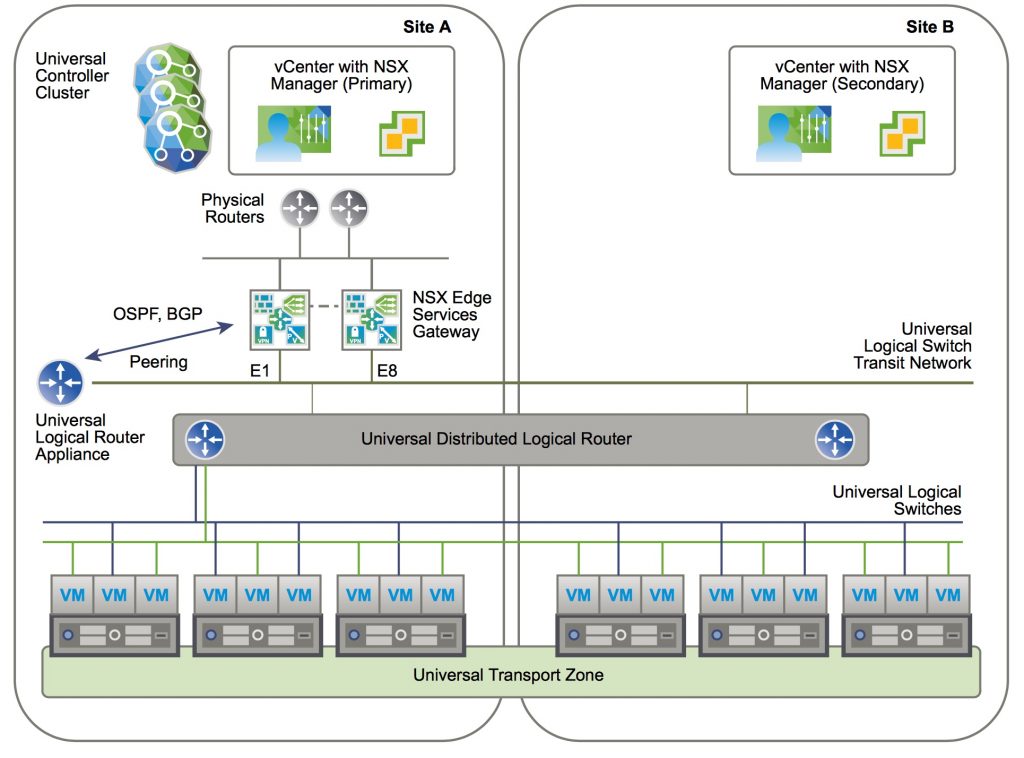
- The same as deployment as the single site
- Only one local egress
- Cross-vCenter NSX spanning 2 sites with local egress per site
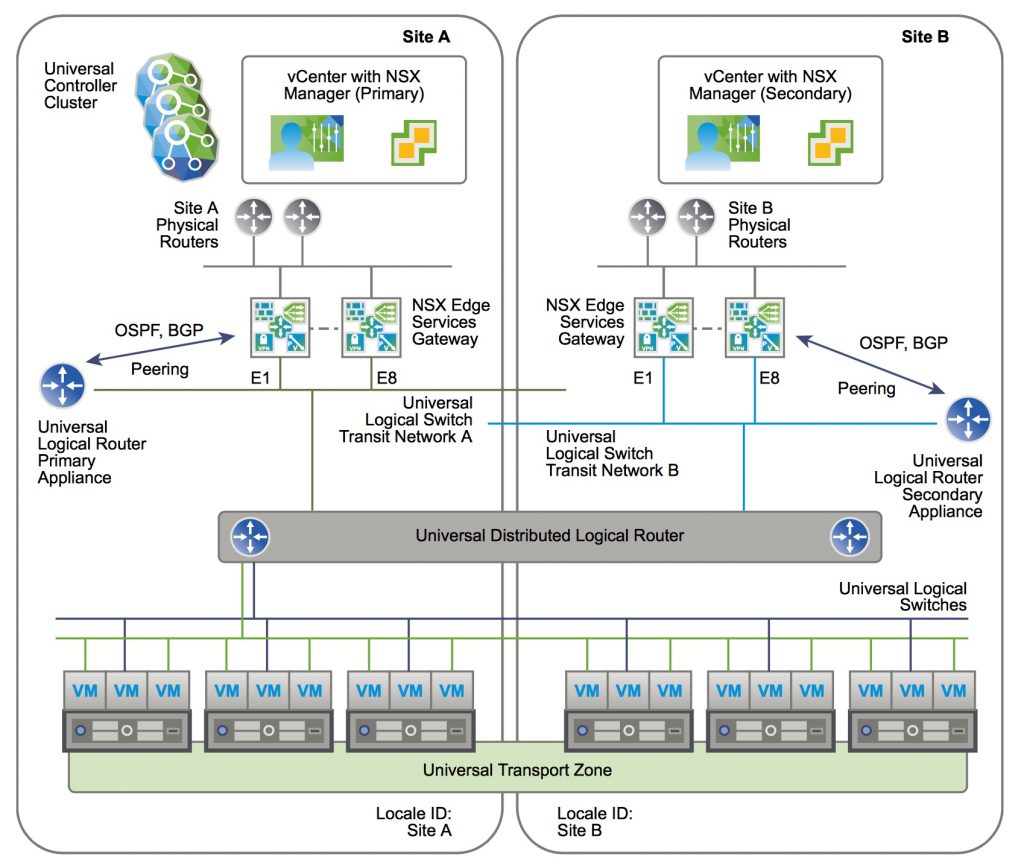
- A ULDR with 2 Universal Logical Router Appliances to handle their local egress
Objective 8.2: Determine Cross-vCenter Requirements and Configurations
Deploy a Cross-vCenter NSX environment
After vCenter installation (multiple than one obviously), cluster configuration with dVS and enough available resources (see NSX installation requirements), it’s time to build a Cross-vCenter, and it’s possible to build it:
- with Enhanced Linked Mode:
- links multiple vCenter Server systems by using one or more Platform Services Controllers
- This allows you to view and search the inventories of all linked vCenter Server systems within the vSphere Web Client
- it might make sense in large deployments
- without Enhanced Linked Mode
Tasks for primary and secondary NSX managers:
- Install the NSX Manager Virtual Appliance
- Configure SSO
- Register vCenter with NSX Manager: Only one NSX Manager can be registered with a vCenter. Changing a vCenter registration can lead to an issue in which the change does not get communicated correctly to all affected vCenters and NSX Managers.
- Install and Assign NSX for vSphere License
- Exclude Virtual Machines from Firewall Protection (vCenter, partner service VM, VM that requires promiscuous mode, SQL involved with vCenter use, vCenter web server if in a separate VM)
- Configure primary NSX Manager
- Deploy NSX controller
- Prepare hosts -> to install vibs esx-vsip and esx-vxlan
- Configure VXLAN
- Assign a Segment ID pool (such as 5000-5999):
- If VXLAN is in place in another NSX deployment, consider which VNIs are already in use and avoid overlapping VNIs
- To configure multiple ranges you can use only NSX API
- Assign Primary role.
- Assign a Universal Segment ID Pool on the Primary NSX Manager: Enter a range for universal segment IDs, such as 900000-909999.
- Add a Universal Transport Zone on the Primary NSX Manager
- Add a Universal Logical Switch on the Primary NSX Manager
- Add a Universal Logical (Distributed) Router on the Primary NSX Manager
- Configure secondary NSX Manager(s) (up to 7 secondary NSX manager in a cross-vCenter)
- Add a Secondary NSX Manager
- Prepare Hosts on a Secondary NSX Manager
- Con gure VXLAN from the Secondary NSX Manager
- Assign a Segment ID Pool for a Secondary NSX Manager: enter a range such as 20000-29999
- Add Clusters to the Universal Transport Zone
- Optionally is possible to configure local objects per NSX deployment (both primary and secondary):
- Add Transport zone
- Add logical Switch
- Add DLR
- Add Edge services
- Add/Remove Host to a prepared cluster
Note on segments ID:
When determining the size of each segment ID pool, keep in mind that the segment ID range controls the number of logical switches that can be created. Choose a small subset of the 16 million potential VNIs. You should not configure more than 10,000 VNIs in a single vCenter because vCenter limits the number of dvPortgroups to 10,000.
If VXLAN is in place in another NSX deployment, consider which VNIs are already in use and avoid overlapping VNIs. Non-overlapping VNIs is automatically enforced within a single NSX Manager and vCenter environment. Local VNI ranges can’t be overlapping. However, it’s important for you make sure that VNIs do not overlap in your separate NSX deployments. Non-overlapping VNIs is useful for tracking purposes and helps to ensure that your deployments are ready for a cross-vCenter environment.
Note on NSX Manager:
can have 4 roles:
- Primary
- Secondary
- Standalone
- Transit
Source: https://docs.vmware.com/en/VMware-NSX-for-vSphere/6.2/nsx_62_cross_vc_install.pdf