In the last article, I introduced how Skaffolder, giving an architecture overview with models and methods, is generating the foundation code for User authentication and authorization and all CRUD actions for the objects which are composing the application. Effectively the coding effort is reduced only on custom methods which are making the real purpose of the application.
Before going ahead, it is necessary to customize the template files under .skaffolder directory. Let’s see in-depth…
Dockerfile, docker-compose, and properties
Under .skaffolder/template there are two files which are responsible to generate docker-compose and Docker file. In a development environment you should make the following modifications:
File: Dockerfile.hbs
|
1 2 3 4 5 6 7 8 9 10 11 12 13 14 15 16 17 18 19 20 21 22 23 24 25 26 27 28 29 30 31 32 33 34 35 36 37 38 39 40 41 42 |
**** PROPERTIES SKAFFOLDER **** { "forEachObj": "oneTime", "_partials": [] } **** END PROPERTIES SKAFFOLDER **** # Create image based on the official Node 6 image from dockerhub FROM vmware/powerclicore:latest # Install nodejs RUN tdnf install -y tar gzip xz git RUN tdnf install -y nodejs npm # Add vsphere api RUN npm i -g node-vsphere-soap --save RUN npm i -g @angular/cli # Create a directory where our app will be placed RUN mkdir /app # Change directory so that our commands run inside this new directory WORKDIR /app ### In production uncomment # Copy dependency definitions #ADD /package.json /app/ # Install dependecies #RUN npm install # Link current folder to container #ADD . /app/ # Expose the port the app runs in EXPOSE 3000 #### Uncomment in production # Serve the app #CMD ["npm", "start"] #### Comment in production RUN touch /var/log/app.log CMD ["tail","-f", "/var/log/app.log"] |
Remember to uncomment dependency definition and “npm install” in production and also substitute CMD with “npm start”.
Note: You could use app.log to output debug.
File: docker-compose.yaml.hbs
|
1 2 3 4 5 6 7 8 9 10 11 12 13 14 15 16 17 18 19 20 21 22 23 24 25 26 27 28 29 30 31 |
**** PROPERTIES SKAFFOLDER **** { "forEachObj": "oneTime", "_partials": [] } **** END PROPERTIES SKAFFOLDER **** # Docker-compose version version: '2' # Define the services/containers to be run services: # Service name app: # directory of Dockerfile build: ./ ports: - "3000:3000" # link this service to database service links: - "database:db" volumes: - './:/app' # Database service name database: # image to build container from image: mongo ports: - "27018:27017" |
In my opinion, the best way to execute PowerCLI scripts in a non-windows environment is using Photon. Inside Docker-hub there’s an image called vmware/powerclicore based on Photon2 that I’ll use in this integration as development and productive environment.
Through TDNF package is possible to install NodeJS, AngularJS, VMware vSphere libraries and whatever is needed to run Swagger API, call vCenter by SOAP or simply present a UI framework based on VMware Clarity.
Under development, I suggest to link the “code” directory and manually handle NodeJSstart and stop. When the code is ready for production you must add the code and execute NodeJS on container start.
My customization ends with properties.js.hbs which guide the generation of some environment data:
|
1 2 3 4 5 6 7 8 9 10 11 12 13 14 15 |
**** PROPERTIES SKAFFOLDER **** { "forEachObj": "oneTime", "_partials": [] } **** END PROPERTIES SKAFFOLDER **** module.exports = { {{#each dbs}} {{name}}_dbUrl: 'db:27017/{{name}}', {{/each}} publicPath: 'public', port: 3000, tokenSecret: 'Insert Your Secret Token', api: '/api' } |
In this file, you can make some modifications like the working port, the secret token, the API directory path, etc…
Implement the Launch method: a brief intro on NodeJS async call
A good web application needs asynchronous process every time a long-term process is called, in order to don’t freeze “the user” waiting for task competition. In this case, a PowerCLI execution could an indefinite amount of time to execute. Executing the async process could be a painful developing process if the underline system doesn’t implement a native way to dispatch process, handle execution process, errors and gather all or part of results.
Node.js comes with ChildProcess a library which create and handle synchronous and asynchronous process scheduler without “losing your mind” with other software elements or particular system calls.
The sequence
The script launch process is composed of the following steps:
- Gather the information about path and script name
- Check if the same script is not already running
- Prepare for execution
- Launch the shell script (update DB attribute with state = Running)
- Wait on data (or errors) and store every incoming stream inside a global variable
- Wait on the end of the script and store the variable content in DB
A simple PowerCLI script
To test the real interaction with vCenter I placed the following script called test.ps1 under /app/pcli directory:
|
1 2 3 4 5 6 7 |
# TODO Change with credentials $oData = Set-PowerCLIConfiguration -InvalidCertificateAction:Ignore -Confirm:$false $oData = Set-PowerCLIConfiguration -Scope User -ParticipateInCEIP $true -Confirm:$false $oServer = Connect-VIServer -Server "vcenterip" -Username "[email protected]" -Password "**passhere***" # Result to json Get-VM | select Name, PowerState | ConvertTo-Json Disconnect-VIServer -Server * -Force -Confirm:$false |
Note: Is better use authentication credential file instead of a username and password which are readable directly into the file. (I’ll show this improvement in next posts)
Implementing Launch API Method
Opening the swagger.yaml file, you must check the content of the method
|
1 2 3 4 5 6 7 8 9 10 11 12 13 14 15 |
/scriptexecutions/launch/{id}: get: summary: tags: - ScriptExecution parameters: - name: id in: path description: Id required: true schema: type: string responses: "200": description: OK |
The “parameters” instruction indicates that param id comes from the URL path and is required. The “real” content of the method is located in resource/PowerCLILaunch_db/custom/. Finally, the following code is the real API method which implements asynchronous handling of the shell execution.
|
1 2 3 4 5 6 7 8 9 10 11 12 13 14 15 16 17 18 19 20 21 22 23 24 25 26 27 28 29 30 31 32 33 34 35 36 37 38 39 40 41 42 43 44 45 46 47 48 49 50 51 52 53 54 55 56 57 58 59 60 61 62 63 64 65 66 67 68 69 70 71 72 73 74 75 76 77 78 79 80 81 82 |
const { spawn } = require('child_process'); /** * ScriptExecutionService.Launch * */ app['get'](properties.api + '/scriptexecutions/launch/:id', function(req, res){ // Return variable var bReturn = false; // get the data based on id db_PowerCLILaunch_db.ScriptExecution.findOne({_id:req.params.id}).exec(function(err, obj){ if (err) return handleError(err, res); if (obj.State.indexOf("Running") > -1){ console.log("Already running"); }else{ var oExecutionData = obj; // Finally launch script async var bat = spawn('/usr/bin/pwsh', ['/app/pcli/'+oExecutionData.Filename]); //Process id generated by epoc var iProcessRun = (new Date).getTime(); oExecutionData.State = "Running-"+iProcessRun; // Purge old data oExecutionData.HasResults = ""; db_PowerCLILaunch_db.ScriptExecution.findByIdAndUpdate(oExecutionData._id, oExecutionData, {'new': true}, function(err, obj){ if (err){ console.log(err); } }); console.log("Start Script with process" + iProcessRun ); bat.stdout.on('data', (data) => { console.log("incoming data " + iProcessRun); console.log(data.toString()); // TODO Put data into Result table oExecutionData.HasResults = "Data"; db_PowerCLILaunch_db.ScriptExecution.findByIdAndUpdate(oExecutionData._id, oExecutionData, {'new': true}, function(err, obj){ if (err){ console.log(err); } }); }); bat.stderr.on('data', (data) => { console.log("Error" + iProcessRun); // TODO Handle Error oExecutionData.HasResults = "Error"; db_PowerCLILaunch_db.ScriptExecution.findByIdAndUpdate(oExecutionData._id, oExecutionData, {'new': true}, function(err, obj){ if (err){ console.log(err); } }); }); bat.on('exit', (code) => { console.log("End of script" + iProcessRun); oExecutionData.State = "End-"+iProcessRun; db_PowerCLILaunch_db.ScriptExecution.findByIdAndUpdate(oExecutionData._id, oExecutionData, {'new': true}, function(err, obj){ if (err){ console.log(err); } }); }); bReturn = true; } }); res.send(bReturn); }); |
During the execution, the incoming data stream could happen more than one time, depending on the output data. For this reason is important to gather all strings before proceeding with further operations: use a global variable.
Test, Tips and security improvements
Before starting the application, I suggest to change the URL address in the swagger definition, because probably you’ll unable to call API at 127.0.0.1… change here:
|
1 2 3 |
servers: - url: http://container_host_ip_fqdn:3000/api description: Local server for testing |
Now using docker-compose build and docker-compose up is possible run node server in the application generated container:

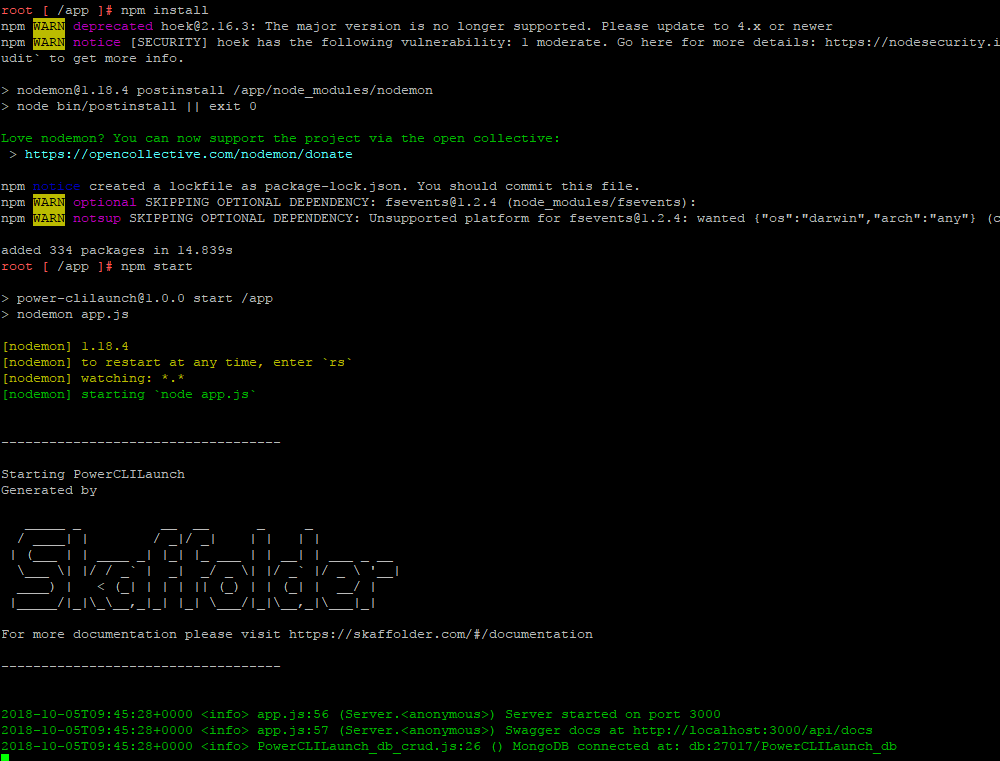
Then install modules and run the web server with npm install and npm start:

And browsing to http://container_host_ip_fqdn:3000/api/docs you’ll see the API documentation and tool page.
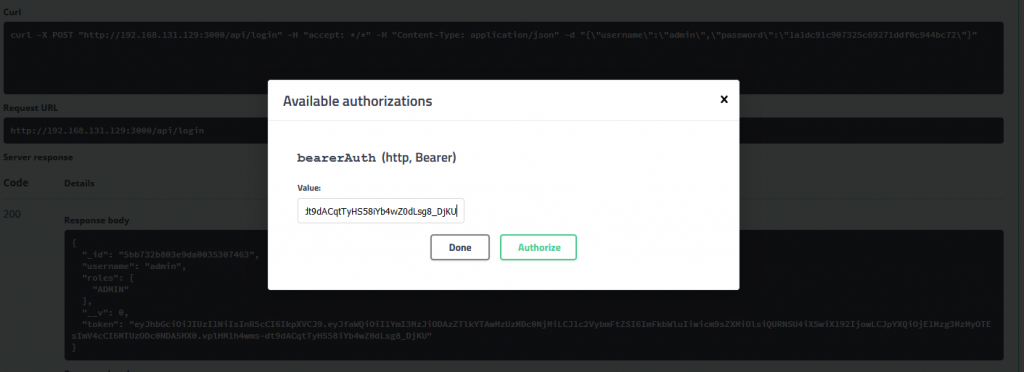
To successfully interact with the API you must log in (following the parameters provided in the example: admin/pass), copy the response token and place in the authorize barer parameter

Then insert a new ScriptExecution entry using POST /scriptexecution/ CRUD action create with the following parameters:
|
1 2 3 4 5 6 7 8 9 |
{ "Filename": "test.ps1", "HasResults": "", "ResultType": "{\"type\":\"list\",\"name\":\"vm\"}", "State": "", "TimeEnd": 0, "TimeStart": 0, "TimeUpdate": 0 } |
Annotate the ID.
Obviously, to make a “real” test executing PowerrCLI script you must ensure that the docker-host can reach and resolve correctly the vCenter FQDN (and also providing correct credentials). Launch the GET method /scriptexecutions/launch/{id} providing the ID as parameter previously annotated. Here the results:

In the next post, I’ll show the method improvement and how to collect data giving a right pattern.
