GitOps is the best way to operate and execute workloads in Kubernetes clusters. In fact, using a Gitlab repository and some files, it’s possible to build a declarative deployment system able to create and manage namespaces, policies, service accounts, limits…, and the workload rollout. Based on my personal and working experience, I’d like to share in this post how to start using GitOps based on Flux and how to set up a lab based on Minikube and GitLab (public cloud version on gitlab.com).
Architecture and Prerequisites
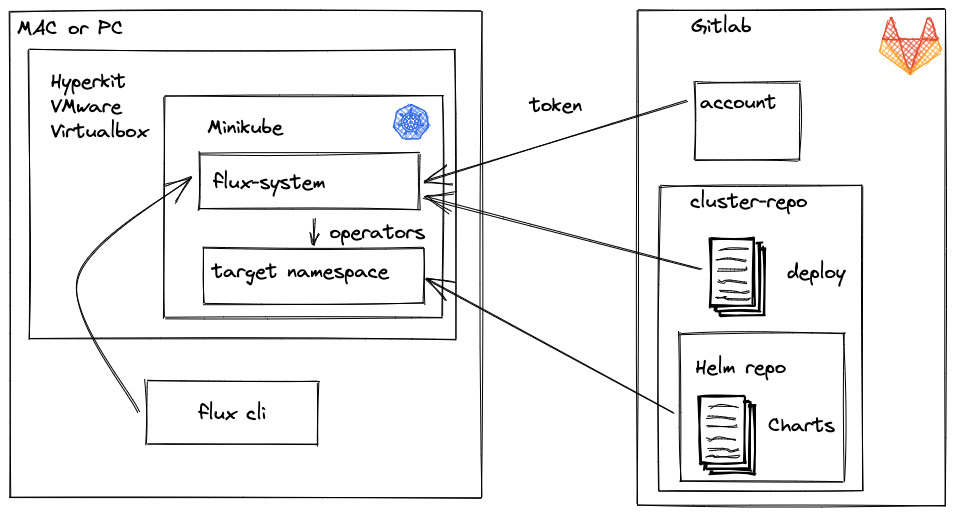
The Flux architecture is really simple and the best way to deploy the whole elements is by using the automated procedure provided with flux CLI and a GitLab cloud edition in order to reduce the installation overhead and unnecessary pressure on Minikube.
Requirements:
- A GitLab account (it’s possible to do the same with Github, but this guide is written for use with GitLab)
- Gitlab ssh keys:
- Connect to Gitlab and click on your account and select “Edit Profile”
- Create a Personal access token:
- in Gitlab.com access to API and read API permission
- create read/write access to the repository and registry
- Don’t forget to set an expiration date
- Copy and store Token in a “safe place”
- A fully functional Minikube cluster (https://minikube.sigs.k8s.io/docs/start/)
- Kubectl and all the smart tools you use to easily manage your Kube Clusters:
- check this page: https://kubernetes.io/docs/reference/kubectl/cheatsheet/
- Install K9s (https://github.com/derailed/k9s)
- Helm
- helm CLI (https://helm.sh/docs/intro/install/)
- helm-push plugin
-
1helm plugin install https://github.com/chartmuseum/helm-push
-
- Flux CLI (see next paragraph)
Easy steps to install with FluxCLI
FluxCLI is the magic tool that creates and maintains Flux installation without driving crazy with configurations, Kubernetes deployments, etc. There are also other ways to manually install Flux, but according to the official doc, this method has become the standard way to deploy and operate with Flux system. For furthers, check the full installation guide here: https://fluxcd.io/docs/installation/.
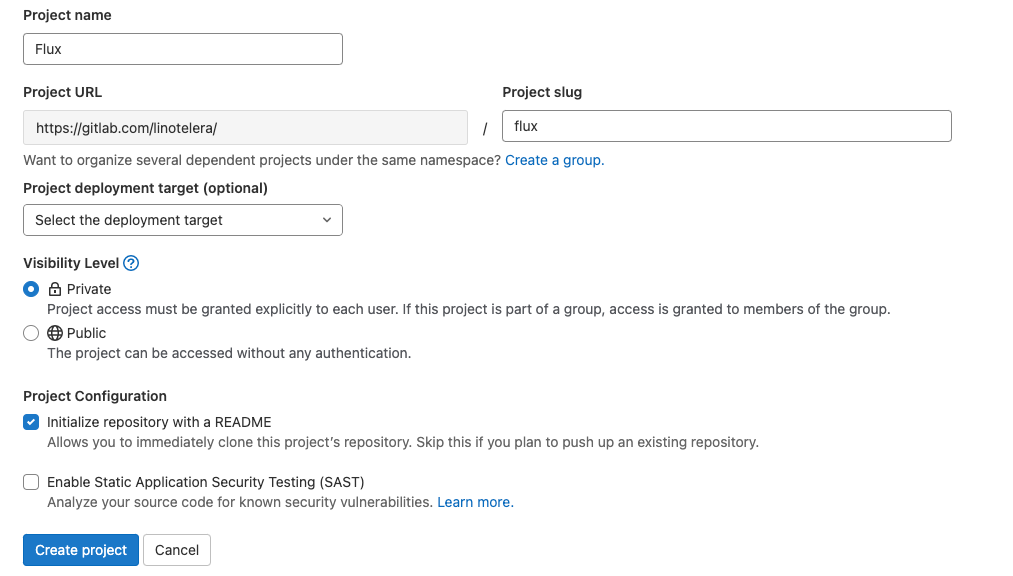
Before proceeding with Flux installation create GitLab private repo like the following:
Now it’s time to move to CLI installation on MAC:
|
1 |
brew install fluxcd/tap/flux |
Before launching the bootstrap, get the token “securely stored” during the Git Personal Access creation and put it into the GITLAB_TOKEN environment variable:
|
1 |
export GITLAB_TOKEN=<token> |
Finally, launch the bootstrap process. Don’t forget to check the correct kubectl context (must be set to the local Minikube).
|
1 |
flux bootstrap gitlab --owner=<gitlab_user> --repository=<repo_name> |
After a couple of minutes, the system is ready to accept the helm releases. This procedure creates:
- a namespace called flux-system and the references to GitLab repo (in case of change of the GitLab token, you must update the Token stored as secret in that namespace)
- a directory in the repository named flux (in the main branch), with all configurations and deployment running in the flux-system namespace. Every change will automatically be applied in the cluster
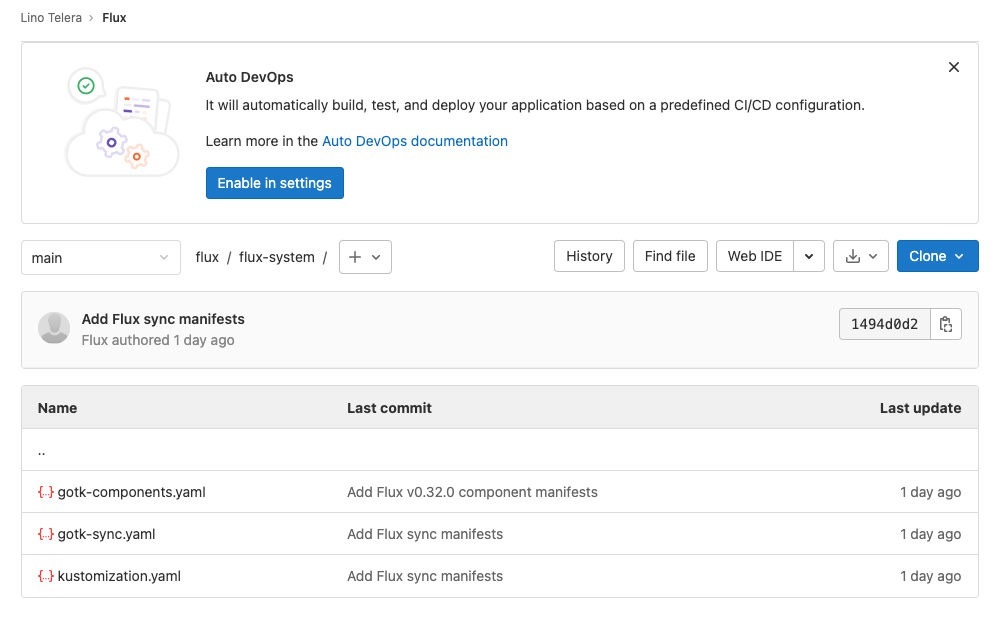
Chart Repository based on GitLab
The last GitLab versions come with a package registry (for Helm Charts) and container registry (for container images). Therefore, in front of the choice of making a Chart Repository (like ChartMuseum) or using “something” without “reinventing the wheels” and with no impact on Minikube, I prefer the last one. So, here is the guide:
Open a CLI and issue the following command to add the Helm repository:
|
1 |
helm repo add --username <gitlab_user> --password <token> gitlab-repo https://gitlab.com/api/v4/projects/<project_id>/packages/helm/stable |
Then use the following command to create an example chart:
|
1 |
helm create example-chart |
Now it’s possible to modify every single file contained in the directory to customize the chart for your purpose. (In this example you can keep the default: a simple Nginx pod with services to test the incoming web connection). When ready type the last commands to package and push the chart in the repo:
|
1 2 |
helm package example-chart helm cm-push example-chart-0.1.0.tgz gitlab-repo |
Add repo chart definition in Kubernetes cluster
In the Flux space, it’s necessary to define the HelmRepository CRD. Create a file named flux-git-helmrepo.yaml file and put the following content, substituting the element in the <> with those specific for your environment:
|
1 2 3 4 5 6 7 8 9 10 11 12 13 14 15 16 17 18 19 |
apiVersion: source.toolkit.fluxcd.io/v1beta2 kind: HelmRepository metadata: name: repochart namespace: flux-system spec: interval: 1m url: https://gitlab.com/api/v4/projects/<project_id>/packages/helm/stable secretRef: name: repochart-user --- apiVersion: v1 kind: Secret metadata: name: repochart-user namespace: flux-system stringData: username: <gitlab_user> password: <token> |
Then apply the CRD with the necessary credentials in the Minikube cluster.
|
1 |
kubectl apply -f flux-git-helmrepo.yaml |
Note: it’s possible specify multiple helmrelease repo, simply adding another HelmRepository and optionally specifing several authentication methods like certificates pairing.
Check the full documentation here:
A Test with the first helm-release
For a better experience with your preferred editor, clone the flux repository on your Mac or PC.
How to create a namespace
- Inside the Flux repo, create a new directory called “namespace1”
- Create a file named “namespace1.yaml” and add the following content
-
1234apiVersion: v1kind: Namespacemetadata:name: namespace1
-
- Commit the changes and wait for the result checking with k9s the namespace creation
How to Create a helm-release
Using the previously published chart example-chart-0.1.0, create the HelmRelease definition with the following steps:
- In the flux repo under the “namespace1” directory, create a file named helm-release-example-chart.yaml
- Add in this file the following content
-
123456789101112131415161718192021222324apiVersion: helm.toolkit.fluxcd.io/v2beta1kind: HelmReleasemetadata:labels:chart: examplechartname: example-chartnamespace: namespace1spec:chart:spec:chart: example-chartsourceRef:kind: HelmRepositoryname: repochartnamespace: flux-systemversion: "0.1.0"interval: 1m0sreleaseName: example-charttargetNamespace: namespace1values:metadata:labels:chart: examplechartreplica: 1
-
- See in Minikube the correct creation using K9s and checking HelmRelease CRD, pods, and services in “namespace1”
From now it’s possible to deploy an application using a different chart or different repo (just specify it in the chart specification, issuing another HelmRepository previously created with the procedure seen in the “Chart Repository based on GitLab” paragraph).
I’m leaving this post with some useful links:
- A Curated list of Kube tools: https://collabnix.github.io/kubetools/
- How to use Gitlab as Helm repo: https://www.howtogeek.com/devops/how-to-use-gitlabs-new-helm-chart-repository/
- Helm release management with Flux (official doc): https://fluxcd.io/docs/guides/helmreleases/