Software Defined Network is a powerful technology able to define and deliver network elements using software and being consumed as a resource respecting the “cloud paradigm”.
The trend of delivery for new applications and systems in virtual environment, that’s run a hardware agnostic computing instance. Networking is going to follow the same path: delivering a link and controlling every packet running from on-premise data center to public cloud regardless the physical interconnections is what SDN claims to realize.
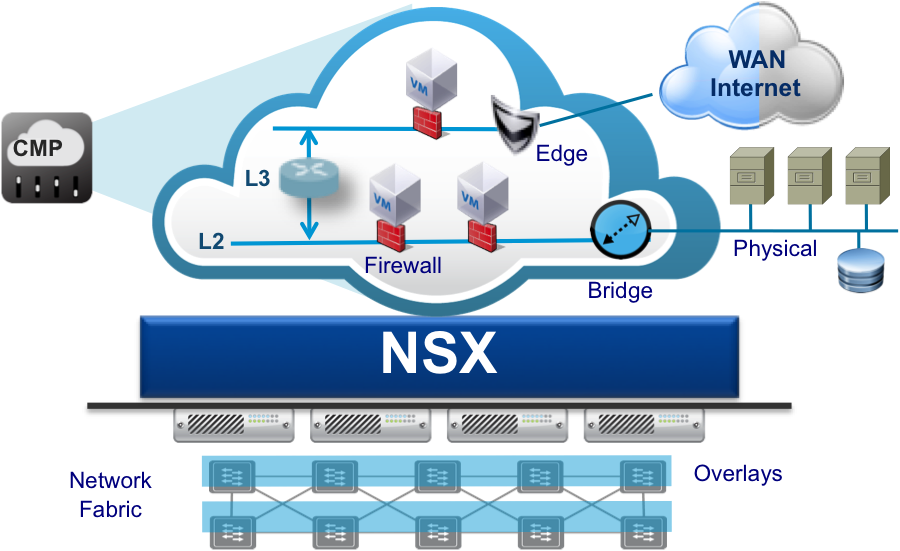
The “magic side” of this technology is the overlay network created on top of physical switches and routes which are involved realize a single, multiple o routed network connection between every end-points.
VMware NSX is the first technology that wrote the foundation of the modern data center network: micro-segmentation, VXLAN, distributed firewalls and routers are all key elements to deliver a new and reliable concept of service communication and security.
But some customers are still anchored to the old theory that is better working with physical network stuffs. CTOs and Network operators without skill are ever worried about performances…
I think that the best way to disrupt this archaic concept is to show NSX, putting the hands on local lab or test in a real case.
In this post I’ll introduce how safely start the NSX installation assuring CTO, network and system guys that no physical network change or downtime is needed during the whole process.
Before starting is mandatory demystifying some wrong concepts around SDN and in particular on NSX:
- Physical topology isn’t mandatory to install NSX, but remember that leaf-spine network topology is the welcome topology that improve performances without become crazy setting up failover or Spanning Tree Protocol.
- East-West traffic represent the real weak part of the system for bandwidth and vulnerabilities. Some network administrators are still omitting the importance of the traffic between virtual machines. This still happens due a lack of visibility virtual datacenter! Anyway this traffic is the most bandwidth consuming that interconnects an important workload that could represent a huge attack surface. For this reason it’s very expensive acquire a physical equipments which take under control every East-West bit.
- VLANs already present in the infrastructure don’t collide with VXLAN. VXLAN is a traffic encapsulation that can run inside a new VLAN and coexist with the other traffic without network disruption.
- NSX is not an exclusive matter for “cloud lovers”. I heard this silly complain during a conversation with some network consultants. << NSX is only used if you’re gonna extend your data center into the cloud!>> WRONG MY FRIEND! NSX in a vSphere environment is still the best way to protect, automate and keep under control all incoming, outgoing and trasversal traffics.
- If you don’t like (or better you don’t have enough money) you can rollback destroying only VXLAN connections and NSX elements, but keeping unaltered VLAN traffic and physical switch configuration.
The most difficult part of the show: gaining the green light
In my experience, the most difficult part of the show is gaining the famous and welcomed “green light” to proceed with deployment.
The problem won’t the project itself, but the divide from innovation and who’s really handling infrastructure operations. They have to guarantee SLA at every cost… and sometimes they consider every change a potential contract violation.

For this reason is important inform and explains the entire operation team that no issue on the infrastructure will happen after NSX implementation… (and this is a chance to grow up the IT guys knowledge). If you still get a big “no”, you should consider building a lab infrastructure with the same vSphere and VMware components versions gathered in production.
Last checks before start:
- vSphere compatibility/interoperability matrix (https://www.vmware.com/resources/compatibility/sim/interop_matrix.php) in order to install the right NSX version.
- Switch MTU must by >= 1600
- vshpere.local administrator credentials (or user with the same privileges).
- Free resources in the cluster and per single host:
- at least 3 host (as best practice)
- NSX manager requires 16GB RAM,4vCPU, 60GB disk or more depending on the infrastructure deployment size
- NSX controller requires 4GB RAM, 4 vCPU, 20GB disk
- NSX edge consumption depends on the size of the appliance (check requirements here).
- I suggest at least 2GB RAM and 1vCPU per hosts, depending on the active NSX features like Guest Introspection and NSX Data Security
- At least 4 management ip (Manager and 3 controllers must be reachable by vCenter and hosts)
- A DNS entry for manager (like manager.domain.local A 192.168.x.y) and controller
- In order to use VXLAN the involved VLAN or L2 connection must have:
- MTU >= 1600
- one ip address for ever host in the cluster (3 hosts = 3 ip addresses)
- NSX license… if needed ask to your VMware account.
Ready, set, go!
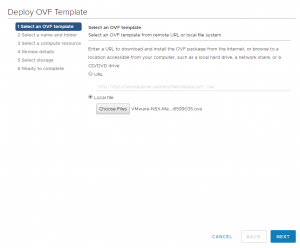
All begins with NSX Manager download and deploy:
- Download here (it requires a valid my.vmware account)
- Deploy OVF template
- select the folder/cluster
- Accept the license agreement
- Choose the right datastore (may be SAN Array, vSAN or NFS) where to place all these management stuffs
- Choose the management network (the same for hosts and vcenter)
- Choose password for CLI (with privileges mode), network settings and check enable SSH if you want to enable it (for POC purpose could be interesting)
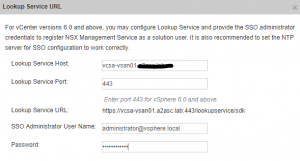
The next phase is vCenter join: this is the unique handshake between compute and networking world.
- After powering on the deployed NSX Manager, connect to the appliance via browser (https://[nsx-manager-ip])
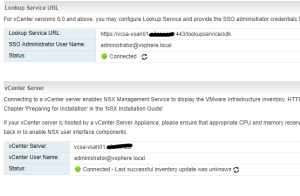
- After logged in with admin and password provided above (the same as CLI), click on Manage vCenter Registration.
- Edit Lookup Service URL and enter PSC hostname (depending on vcenter deployment PSC host could be the same as vcenter host) and enter vcenter administrator credentials, then click OK:
- Do the same for vCenter Server:
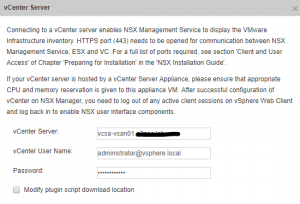
- You should get this situation:
- Logout and login again in the vcenter (with administrator account) and you should find a new icon in the menu called Network and Security.
Now it’s time to deploy controllers (at least 3) adding “NSX Controller Nodes” under “Installation and Upgrade” menu in the “Network and Security” section:
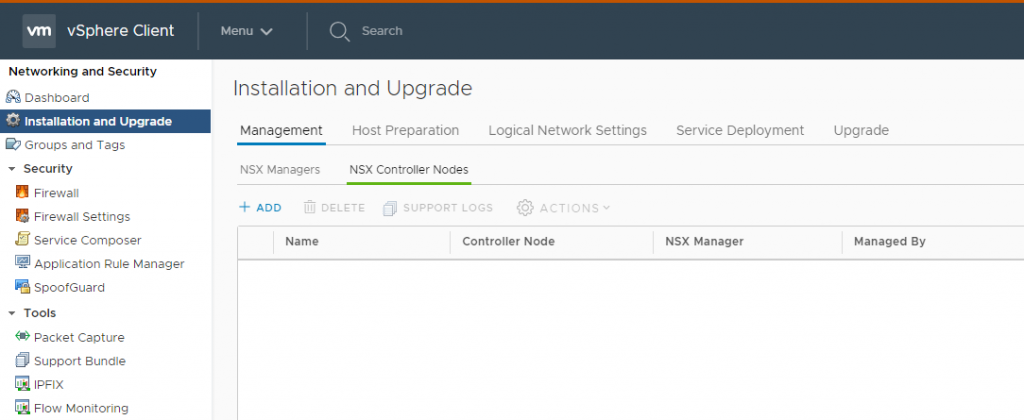
For three times:
- Click Add button
- Insert the NSX Manager password
- Type configuration data such as: Name, Datacenter, Cluster,… and Network with IP Pool (it could be defined once during the first deployment)

Note: before deploy another controller you should wait the current controller being deployed
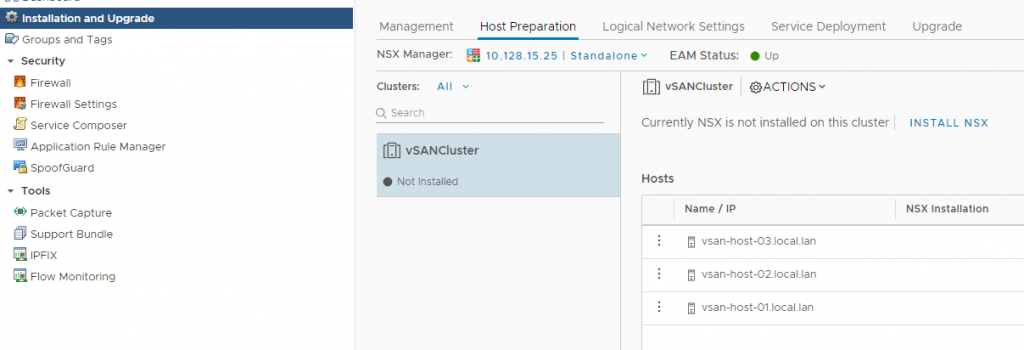
The NSX deployment ends with the host preparation, that delivers Hypervisor components such as VXLAN, DFW and DLR.
Note: before proceed with host preparation, you must enter a valid NSX license key with enough capacity (depending on the cluster size). The default installed license is a vShield replacement which is included in vSphere installation.
- Under Host Preparation Tab (Network and Security -> Installation and Upgrade) click Install NSX
To deliver VXLAN it’s necessary configure a transport zone (a simple VLAN with MTU > 1600). Under “Logical Network Settings”:
- In “Host Preparation” select the cluster then click “Not Configured” link next to VXLAN
- On the opened window configure:
- Distributed Switch and VLAN previously prepared
- MTU (>= 1600)
- vmkernel ip address pool or DHCP (I prefer use the pool)
- vmkernel portgroup failover policy
- Number of VTEP
Finally:
- Under “VXLAN Settings” configure SegmentID pool
- Under “Transport Zone” add new transport zone.
Then a new portgroup with a relative vmkernl ip will create. Now under “Logical Switched” you’re able to deploy VXLAN networks.
After less than a minute you got an infrastructure ready to #RUN NSX!
Disclaimer: this post is a little trick on how to start NSX in a “brown field” scenario. All this information are gathered during my experience on the job.
This won’t substitute the official documentation.
[…] https://blog.linoproject.net/my-deployment-experience-on-nsx/ […]
[…] https://blog.linoproject.net/my-deployment-experience-on-nsx/ […]