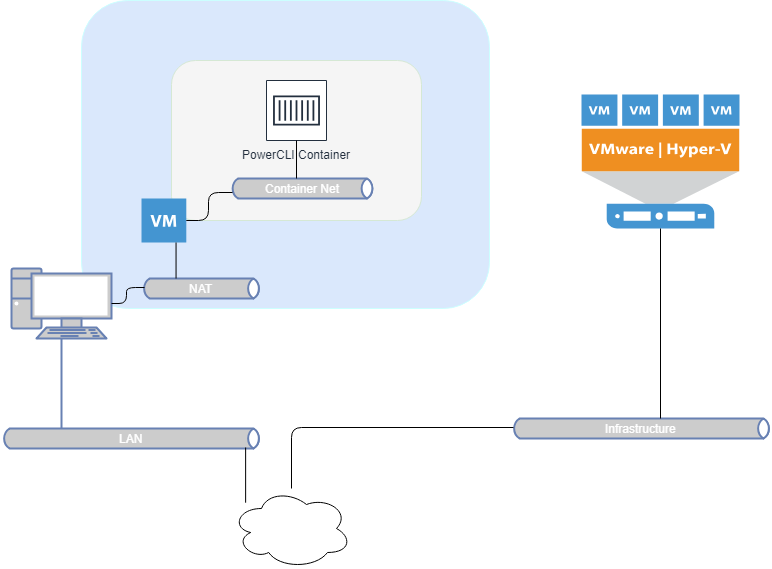
Today the life of sysadmin and developers is really easy! By the use of tools like Vagrant, Terraform, Powershell, PowerCLI, Puppet (…) is possible to automate a lot of infrastructure processes like virtual machine deployment, SDN reconfiguration and a lot of integration with storage elements.
During last month I did some practice with the use of Vagrant to deliver development and production environments with a simple script. The result is a standardized way to deliver “what you need” in every infrastructure abstracting networking, storage, and other OS dependent variables, like IP, DNS, routing and provision scripts.
In this post, I’ll show an example of how to realize a ready to use environment with containers and PowerCLI.
The Architecture
In few words, this is the “wrapper game”: there’s a computational unit, in this case, a Docker container that represents the PowerCLI core system and a light VM that shares a piece of its filesystem with host OS.

The virtualization system choice is independent because of the use of Vagrant abstract the way to deploy and configure the virtual instance inside the host. I tested this example with Vagrant and VirtualBox on Windows 10 system.
I presume it’s possible doing the same with VMware Fusion/Workstation and a paid VMware plugin for Vagrant and a little modification to the Vagrant image for VMware.
The VagrantFile
In order to deliver a Virtual Machine with Vagrant, an empty directory must be created. Then do place the Vagrant file as shown below:
|
1 2 3 4 5 6 7 8 9 10 11 12 13 14 15 16 17 18 19 20 |
# -*- mode: ruby -*- # vi: set ft=ruby : unless Vagrant.has_plugin?("vagrant-docker-compose") system("vagrant plugin install vagrant-docker-compose") puts"Dependencies installed, please try the command again." exit end Vagrant.configure("2") do |config| config.vm.box = "ubuntu/xenial64" config.vm.provision :shell, inline: "apt-get update" config.vm.provision :shell, inline: "mkdir /opt/data" config.vm.provision :docker config.vm.provision :docker_compose, env: { }, yml: ["/vagrant/docker-compose.yml"], project_name: "pcli", run: "always", rebuild: true config.vm.synced_folder "./data", "/opt/data" end |
To start using Docker extension in Vagrant, the vagrant-docker-compose plugin must be enabled or installed if not already present in the system (the first lines in the begging of the Vagrant file).
Then simply provision the VM (in my case based on Ubuntu box), sharing a directory with the host. In this case, the host directory data with the VM directory /opt/data.
Note: shell provision could change depending on the chosen image.
Finally by the use of docker extension and declaring the presence of a docker-compose.yml file it is possible to deploy the Official PowerCLI container.
Note: /vagrant directory is always declared, and is synchronized with the host files in the Vagrantfile directory.
The docker-compose file
Finally, the simple docker-compose file must contain the following code:
|
1 2 3 4 5 6 7 |
version: "2" services: pcli: image: "vmware/powerclicore" command: tail -f /dev/null volumes: - "/opt/data:/root" |
The last synced directory is the previously declared /opt/data with the container “/root”. In this way is possible to edit your PowerCLI files with your preferred editor.
In the end, typing vagrant up and connecting with VM using vagrant ssh it’s possible to launch scripts or simply interact with the virtual infrastructure using PowerCLI… Enjoy!
